Dashboards as Code
You can download your charts and dashboards as code, make changes, then upload your changes back to your Lightdash project using the CLI. Content as code is also useful for creating new Lightdash projects where you want the content to be copied from an existing project and added to your new project.
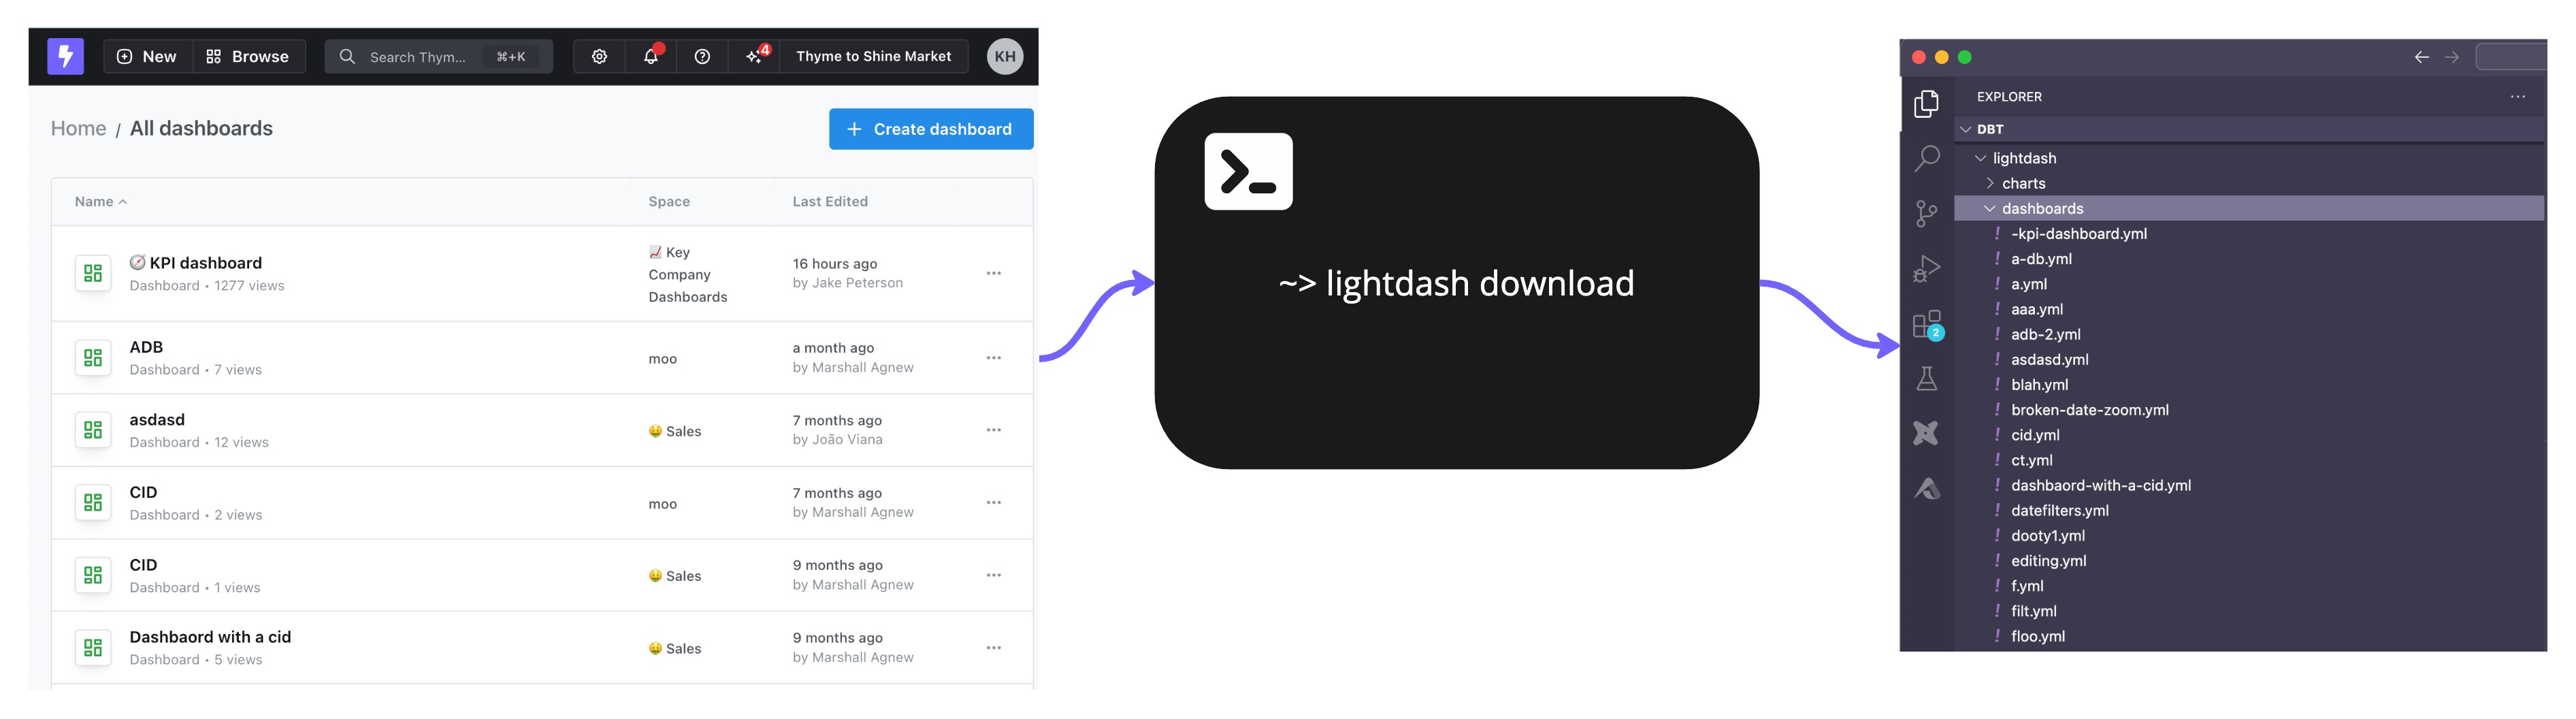
lightdash download
From the Lightdash CLI, you can use the command lightdash download to download all of the charts and dashboards from your Lightdash project as code. All of the charts and dashboards will be written as .yml files to a lightdash directory wherever you're running the command.
E.g. if you're running this command inside your dbt directory (eg: /home/javi/dbt) then it will create a folder (/home/javi/dbt/lightdash). If you're running this command in /home/javi/documents it will create the folder in /home/javi/documents/lightdash.
Running lightdash download will overwrite any changes you have locally
For example:
- I run
lightdash downloadand one of the charts that is downloaded isemea-revenue-per-month.yml - I make some changes to the
emea-revenue-per-month.ymlfile and save them - I do not upload my changes, they are just saved locally
- I run
lightdash downloadagain - The changes I made to
emea-revenue-per-month.ymlwill be overwritten by the latest chart version downloaded from the Lightdash application
Select specific items to download
If you only want to download specific charts to manage as code, you can use the chart selector in the download command.
For example, if I only wanted to download a specific saved chart as code, I would run the command:
lightdash download -c https://app.lightdash.cloud/the-url-to-my-saved-chart
You can use the chart's SLUG, UUID, or the URL to the saved chart to select the chart.
Use lightdash download -d or lightdash download --dashboards to select specific dashboards
This will download the dashboard and all of the charts in the dashboard as code. For example, if I only wanted to download a specific dashboard as code, I would run the command:
lightdash download -d https://app.lightdash.cloud/the-url-to-my-dashboard
You can use the dashboard's SLUG, UUID, or the URL to the dashboard to select the dashboard.
To select multiple charts or dashboards, add a space between the items
For example, this command would select two charts to download:
lightdash download -c https://app.lightdash.cloud/the-url-to-my-first-saved-chart https://app.lightdash.cloud/the-url-to-my-second-saved-chart
You can combine charts and dashboards selection in a single command. For example, this command would download a chart and a dashboard:
lightdash download -c https://app.lightdash.cloud/the-url-to-my-first-saved-chart -d https://app.lightdash.cloud/the-url-to-my-dashboard
Specify your download path
By default, lightdash download will create a new lightdash directory in your current working directory and write the content there. You can customize the directory that you write to using lightdash download -p. For example:
lightdash download -p /Users/katiehindson/lightdash/lightdash-analytics/
This will create: /Users/katiehindson/lightdash/lightdash-analytics/charts/ and /Users/katiehindson/lightdash/lightdash-analytics/dashboards and save the content to these new folders.
You can also use relative paths like:
lightdash download -p ../
Specify a project to download
Running lightdash download will download all content from your current set project (set using lightdash config set-project). But, you can download content from another project using lightdash download --project my-project-uuid. For example:
lightdash download --project 21eef0b9-5bae-40f3-851e-9554588e71a6
You can find a project's UUID from your Lightdash URL. For example, https://app.lightdash.cloud/projects/123-project-uuid/. Here, the project UUID here is 123-project-uuid .
lightdash upload
From the Lightdash CLI, you can use the command lightdash upload to upload any changes you've made to your charts or dashboards as code. To upload new charts that you've created as code to your Lightdash project, you need to run lightdash upload --force
Select specific items to upload
For example, if I only wanted to upload a specific saved chart as code, I would run the command:
lightdash upload -c my-saved-chart-slug
You must specify the chart using the chart's SLUG.
If I only wanted to upload a specific dashboard as code, I would run the command:
lightdash upload -d my-dashboard-slug
You must specify the dashboard using the dashboard's SLUG.
To select multiple charts or dashboards, add a space between the items
For example, this command would select two charts to upload:
lightdash upload -c my-saved-chart-1-slug my-saved-chart-2-slug
Specify your upload path
By default, lightdash upload will upload all items you have saved in the lightdash directory in your current working directory. You can customize the directory that you upload from using lightdash upload -p. For example:
lightdash upload -p /Users/katiehindson/lightdash/lightdash-analytics/
This will upload all content from: /Users/katiehindson/lightdash/lightdash-analytics/charts/ and /Users/katiehindson/lightdash/lightdash-analytics/dashboards.
You can also use relative paths like:
lightdash download -p ../
Specify a project to upload to
Running lightdash upload will upload all content to your current set project (set using lightdash config set-project). But, you can upload content to another project using lightdash upload --project my-project-uuid. For example:
lightdash upload --project 21eef0b9-5bae-40f3-851e-9554588e71a6
You can find a project's UUID from your Lightdash URL. For example, https://app.lightdash.cloud/projects/123-project-uuid/. Here, the project UUID here is 123-project-uuid .
Only content as code that you've made changes to will be uploaded
For example:
- I have a chart that I've downloaded as code called
total-sales-worldwide.ymlin mylightdash/directory - I only make changes to that chart's .yml
- I run
lightdash upload total-sales-worldwide.ymlis the only file that gets uploaded because it's the only file that I made changes to
For example:
- Katie has a chart that she's downloaded as code called
total-sales-worldwide.ymlin herlightdash/directory - She doesn't make any changes to the chart as code
- Javi opens the same chart,
Total sales worldwide, in the Lightdash application, makes some changes, and saves them - Now, Katie's
total-sales-worldwide.ymland theTotal sales worldwidechart in the application are different. - Katie runs
lightdash upload - Katie's
total-sales-worldwide.ymldoes not get uploaded because she made no changes to the chart as code - Javi's changes to the
Total sales worldwidechart that he made in the Lightdash application are not overwritten (the version he created is what we see in the Lightdash application)
Content that's been downloaded as code can still be updated in the Lightdash application
For example:
- There is a Lightdash project called
Stellar Marketing - Priyanka runs
lightdash downloadand downloads all of the project's content as code, including a chart calledTotal new clients - Jake opens the
Total new clientschart in the Lightdash application and makes some changes - Priyanka doesn't run
lightdash download, so thetotal-new-clients.ymlchart that Priyanka has as code is the old version of the chart, before Jake updated it. - Priyanka makes changes to
total-new-clients.ymlthen runslightdash uploadand uploads her changes and overwrites the changes that Jake made in the Lightdash application. - Both Jake and Priyanka can update the same chart as code, or in the Lightdash application.
Lightdash content templates
You can use the lightdash download and lightdash upload commands to easily build templates for Lightdash content and reuse these templates to build new or update existing projects.
Creating a new Lightdash project from a Lightdash template
If you're creating many dbt projects with similar models and want to easily spin up new versions of these projects, but with different table, field, or chart names, then you can use content as code to create a Lightdash template of your project to reuse.
To do this, you'll need to:
- Take your existing Lightdash project with all of the content that you want to copy.
- In the CLI, run
lightdash downloadto download all of the content as code from the project - Navigate to your new dbt project that you want to connect to Lightdash.
- Copy-paste over the
lightdash/directory inside your new dbt project with all of the content as code from your template project (or, only copy over the content that you want to use in your new project) - Once you're happy with your content, you're going to run
lightdash config set-projectand select your new Lightdash project from the list of projects - Then, you'll run
lightdash upload --forceto upload all of the content as code you've added in yourlightdash/directory to your new Lightdash project
Adding content to an existing project from a Lightdash template
Sometimes, if you're managing multiple dbt projects with similar models, you want to be able to easily create and manage the same charts and dashboards across all of the projects at the same time. You can do this with content as code to create a Lightdash template project.
- You want to create a Lightdash project that only contains all of the content that you want to share across your projects
- From your CLI, you can run
lightdash downloadto download all of this content as code - You can then copy-paste the .yml files that get written across to any of the other dbt projects you have where you want to reuse the same charts and dashboards.
- Once you've copied over any content that you wanted to manage across projects, from the CLI, you should run
lightdash config set-projectand select the project where you've added these new charts/dashboards as code to. - Then, you should run
lightdash uploadto upload all of the new content as code.
Using community templates
Alongside making templates from your own project, you can also use templates from the lightdash-templates repo to quickly build dashboards on top of common datasets.
For example, if you are using BigQuery as your data warehouse, you can use the community templates to build a usage tracking dashboard in a matter of minutes.
There are detailed instructions within the repo, but the general steps are as follows:
- Identify the content you wish to implement, and navigate to the relevant folder.
- Copy the content from the
Lightdashfolder into your dbt project. - Run
lightdash upload --forceto push your new content to Lightdash.
Note that these templates still rely on access to an underlying dbt model containing the relevant data, you might need to create or adjust this following the instructions in the lightdash-templates repo.